Friday, July 12, 2013

Freebie Illustrations, Flowers

See earlier posts in this set:
Part 1 - Vintage Ladies

Here's more of the vintage graphics. As a said earlier, these are from a very old cookbook that I found in Southern Oregon when I was living there. Here's a few flowers I cleaned up.


 photo yiskahsig.jpg

Thursday, June 27, 2013

Thrift store goodies!

A quick update, we had some time today to run down to Idaho Falls and go thrifting! We found this awesome sign for our future craft room...

And some fabric for my bedroom do-over. I had the black with the white designs on it from another trip, today we bought the deep red corduroy and I started in on the pillowcases!


I followed the YouTube tutorial by Crafty Gemini, it's so easy to follow! Even with messing up on my cutting initially, I was able to fix the problem and still get a great result. All in all, this pillowcase came in at less than $0.50 and about an hour of labor. :)


While I'm posting the pillowcase, here's the matching chest of drawers. That panel was a broken mirror, I just turned it around and Mod Podged the fabric onto the back of it. I'm planning on matching curtains to finish the look.

 photo yiskahsig.jpg

Monday, June 24, 2013

Freebie Illustrations

A couple of years ago I bought some vintage cookbooks, I think they were put out by a church in Southern Oregon. These books had some adorable images, so I scanned them in and fixed them up. Since the books were printed prior to 1978 and all attempts to locate the publishers led to dead ends, it's safe to assume these should be in the public domain. Of course should someone come forward and say otherwise, I'll be happy to take these down, but until then I'd like to share them since they've just been sitting on my hard drive!
I'll be releasing these in little sets since I have a whole folder of them. Here's some adorable little housewives, a fashionista and a swimming girl.


If you make something cute, link it in the comments and I'll share in in a future entry. I hope you enjoy these!

 photo yiskahsig.jpg

Friday, June 21, 2013

How- To : Beaded Dream Pendants

This is an idea I've been playing around with in my head for awhile now and just recently put it into action when I found the PERFECT bead to use as the base. I thought it was cool enough to share how I did it, I hope you find this inspiring!

Here's a finished piece:

To make this, here's what you'll need:
  • A pre-drilled, large, flat bead for the base. I bought mine on sale at Porter's, this kind came in all different shapes & even colors. I think a lot of different materials would work well for this.
  • Seed beads in varying colors
  • Other small beads or gemstone chips (optional)
  • Mod Podge
  • A small, cheap brush.
  • Needle nose pliers or tweezers for gripping the tiny beads.
  • Paper towels & a cup of water, as needed for keeping brush clean.

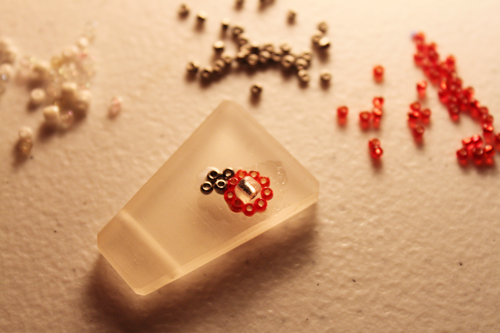
Here's the base bead with some of the seed beads to show the size of what I was working with. You can go larger or smaller on both the pendant itself and with the little beads. There's a lot of room for creativity here, the end result is very organic and forgiving so you can feel free to play with it!


You can start by drawing out your basic shapes, I personally don't because I like to let the shapes and sizes of the beads guide my design.

This is so super simple, all you do is cover a small area with enough Mod Podge to get the beads to stick. Using your pliers, place the beads one at a time onto the surface where the Mod Podge is. Let it get tacky so you don't disturb the beads you've already placed, then repeat adjacent to the last section you finished.
As you can see, I started with a larger bead and built around that. You can see here where the Mod Podge overlapped and dried a bit, that's totally fine! Just as long as you don't put it on too thick, it's okay to have it extend out, it's going to get covered anyways. If it dries too thick it can make the surface too bumpy and take waaay too long to dry.
Finish until the entire surface is covered. The edges may be irregular, personally I love that look and it'll be okay as the beads aren't hanging off the surface. Coat with a few layers of Mod Podge, letting it dry in between. If you plan on exposing it to water you may want to clear coat it as well, as the Mod Podge won't hold up if submerged.


 photo yiskahsig.jpg

Tuesday, June 18, 2013

Here we go!

I have a confession, I am a chronic blog abandoner. It's a long held pattern, before the Internet I was also a journal abandoner, writing two or three entries then ultimately forgetting about the hopes and dreams I built of being a regular writer, then picking up a new journal a few months later only to repeat the cycle. In the not-so-distant past I went so far as to purchase a domain and hosting to deter myself from abandoning my latest blogging creation, that was a whopping success of... exactly one entry. So here I am, attempting another go at keeping a blog. Maybe this confession will help me shed the guilt and stick with it, don't give up on me yet!

I suppose this will serve as a lifestyle and crafting blog. I'm pretty sure my Facebook friends are sick to death of my pictures of food, sewn goodies and beaded creations. I need a healthy outlet for sharing, one where I don't run the risk of posting one-too-many photos of whatever strange thing I've put together for dinner. And being just over 6 months married and teaching myself to cook on a budget, yeah, whole lotta strange in my kitchen!

What you WON'T find here is perfection. Like my blogging endeavors, my life is busy, complicated and things often go undone for long periods of time. I'm also a chronic project abandoner too, my craft area is approximately 5% husbeans crafts, 15% stash, and 80% unfinished projects. And sometimes things go horribly, terribly wrong and what should have been a beautiful pink potholder looks more like a pepto bismol colored rock cozy. It happens. While I'm confessing, some days (most days) my house looks like we have a tornado that has just left after stopping in for some herbal tea and a chat. I'm not the cookie cutter lifestyle blogger. I'm in awe of those that are and have a lot of respect for women that can manage a home, keep a job, raise a house of kids, budget like a master, sew clothes for the whole family and have a pantry full of canned goods, all with a smile and sans meltdowns. Those women rock, but I'm not in that category. And I'm totally fine with that, I hope that you dear reader, will find that as refreshing an idea as I do. Because I'm really looking forward to sharing my imperfect but fun life with you.

On that note, I'll leave you with a little about me so that you'll know me as something more than "crazy lady who never finishes anything." That's just too much of a mouthful. My name is Yiskah and I'm 25. I was married to my husband on 12/12/12 after dating for a month and a half (have I mentioned I'm also impulsive? Because I am.) I'm finishing up my B.A. In Humanities and have a background in photography, graphic design, and allied health. I enjoy crafts, sewing, thrift shopping and Star Trek. We live in Idaho with our rat Teancum R. Sinatra (Tea, for short) and a revolving cast of fish.

Our -20 degree wedding under the whale bones in Barrow, Alaska